How to Create Interactive Walkthroughs Without Code
Interactive walkthroughs let users experience product flows directly, improving onboarding, conversions, and lowering support load. This guide explains why they matter for SaaS teams, how no-code demo builders speed creation and enable safe, personalized demos, and outlines a practical, step-by-step process: define the story, map screens, record or assemble steps, add hotspots, personalize, test with users, and publish with automation. It covers metrics to track (completion, time, CTA, support impact, conversion), common pitfalls, templates, integration and resourcing tips, and a checklist before publishing. The post also highlights demodazzle as an example no-code tool and urges small pilots to prove value.
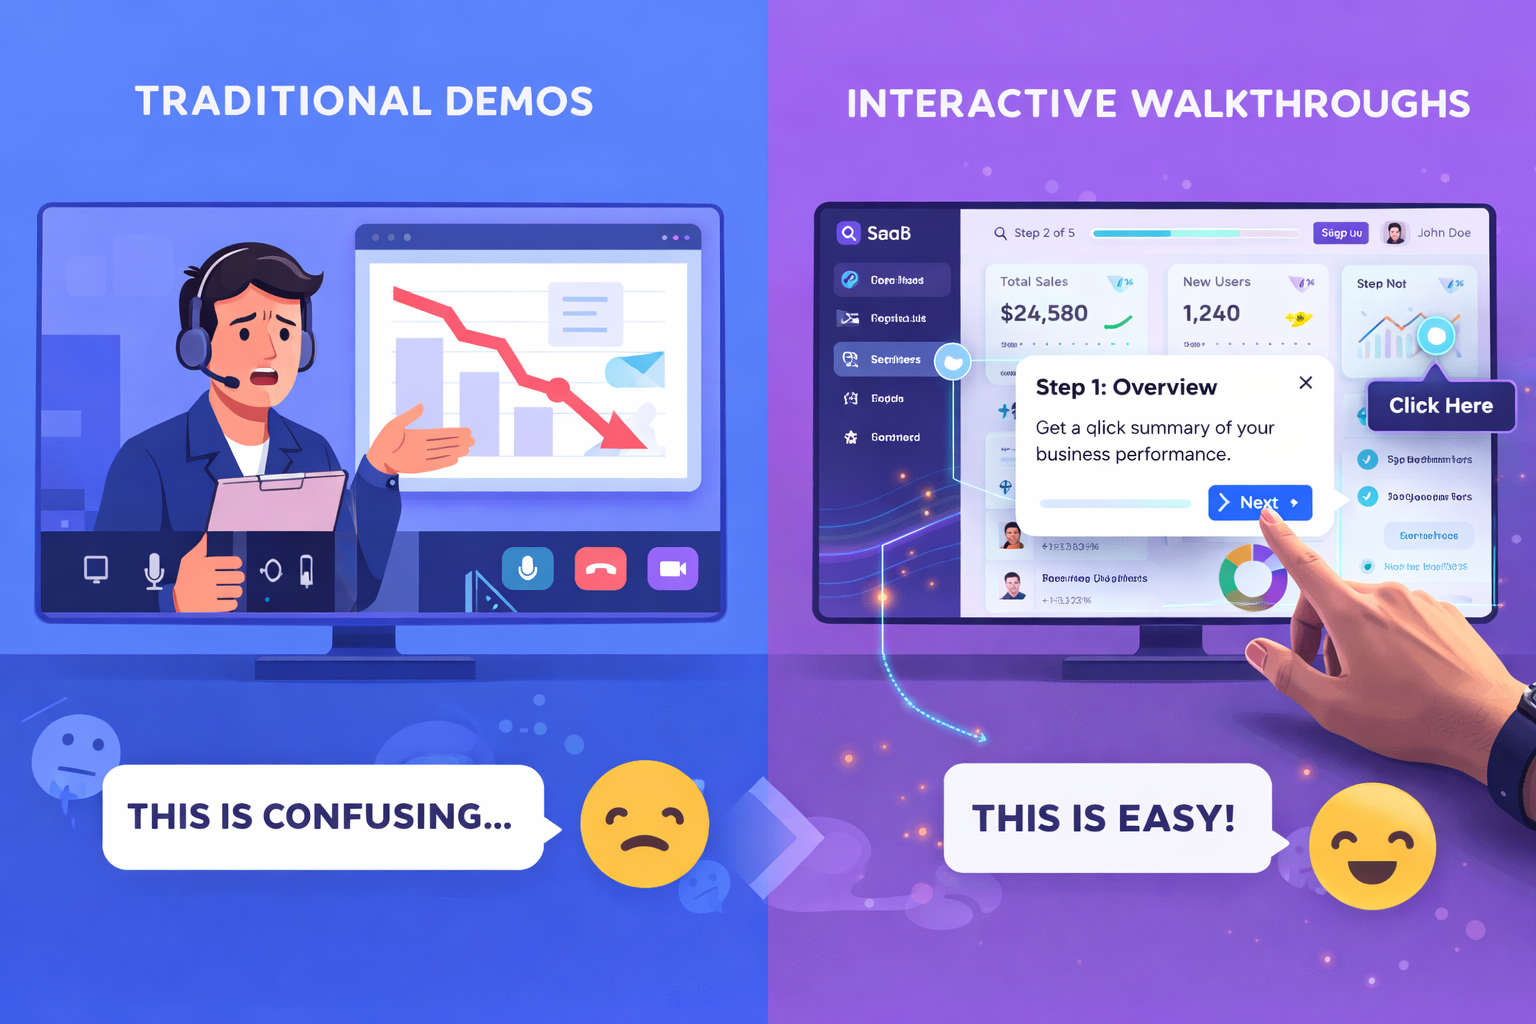
I recall the very first time that I had to describe a complicated feature to a potential customer. I resorted to using slides, showing my screen, and enhancing my explanations with gestures. At times this approach would produce results but generally it was slow and not very reliable. Fortunately today, interactive walkthroughs eliminate that hassle. They allow you to demonstrate, not only talk about, and you accomplish it without getting your engineering team to stop everything.
If you are a SaaS founder, a product marketer, a sales rep, or on a customer success team, this guide is for you. I'll explain the reasons why interactive product demos are significant, the ways no code tools make it easier to create them, and how to design walkthroughs that really change things. Besides that, I'll discuss concrete actions, typical errors that I come across, and simple instances you can imitate immediately.
Why interactive walkthroughs matter
The truth is, that people learn best by firsthand experiences. Static screenshots or lengthy videos might not be able to sufficiently respond to genuine questions. Interactive walkthroughs provide users with a direct, guided exposure. They allow prospects to work through product flows, observe results, and acquire a sense of security when using the UI. Such a sense of security results in quicker onboarding, improved trial-to-conversion rate, and reduced support tickets.
From my experience, demos that let users click, type, and progress through real steps reduce hesitation. Instead of wondering if a feature fits their workflow, they get a mini proof of concept in minutes. That is huge for sales conversations and onboarding funnels.
- Faster onboarding experience: Users reach "aha" moments sooner.
- Better conversions: Prospects who try before buying convert more often.
- Lower support load: Walkthroughs answer repetitive questions proactively.
- Scalable training: Product marketing and customer success scale without more headcount.
No code tools change the game
Not long ago you needed engineering help to build guided tours or product sandboxes. Today no code demo builders let product teams move fast. You can design interactive product demos without writing a line of code. That means quicker experiments, faster iterations, and less backlog jockeying for engineers.
I've tried a few no code tools. Some are clunky. Others feel made for marketers and not product teams. A good tool balances ease of use with enough control to match your product's flows. You want a tool that records interactions, injects simulated data, and personalizes content for different buyer personas.
Core benefits of using a no code demo builder
Let me be blunt. You could manually create videos or host live demos forever and still get deals. But no code tools give you a few practical advantages that pay for themselves quickly.
- Speed: Put together a smooth demo in just a few hours instead of weeks.
- Consistency: Since all users are shown the main steps, your message is easier to repeat.
- Safety: Use demo environments to disguise real data and preclude security issues.
- Personalization: Modify demos for various roles or industries without engineering work each time.
- Demo automation: Use out the website, in-app, or email walkthrough triggering to cut down on manual demo time.
In practice, those translate to fewer lost deals, faster ramp for new users, and better content for sales and customer success to use in the field.
How to plan your interactive walkthrough
Good walkthroughs start with good planning. Before you open any tool, sketch what you want users to learn. Think about the smallest path to the "aha" moment. We want short, focused tours that highlight value fast.
Ask yourself these questions:
- Who do you think this step-by-step guide is targeting? Someone using the system for the first time, a buyer during a sales transaction, or a newly appointed administrator?
- What is the one result that you want them to accomplish?
- How much time do you think the entire experience should take? Usually it is better to keep things short.
- Which visible components of the user interface are necessary to highlight and which ones can be considered just background noise?
Say, if you are dealing with a CRM, a walkthrough that is handy for the sales people could include a demonstration of how to enter a new lead, update the status, and set a reminder for follow up. They should not see the entire configuration. Such training should be left for more advanced learners.
Step-by-step: Build an interactive walkthrough without code
Let’s walk through a practical workflow. These steps work with most no code tools and will save time during creation.
1. Define the story
Start with a one-sentence value statement for the walkthrough. Something like "Show how to create and qualify a new lead in less than two minutes." This keeps the demo focused.
Then outline the steps in a plain list. Keep each step short. If a step is long, split it. People’s attention spans are limited, so plan micro wins along the way.
2. Map the screens
Open your app and walk the flow manually. Take notes on which pages, modals, or micro-interactions matter. If your product has multiple routes to the same outcome, pick the most intuitive one for first-time users.
Also document data needs. Will you need sample customers, fake invoices, or placeholder text? Most no code tools let you inject test data or replay interactions without hitting production systems.
3. Record or assemble steps
Most no code demo builders let you either record a session or assemble steps using a visual editor. Recording is faster. Editing afterwards gives you control.
When you record, move deliberately. Click slowly. Enter predictable data like test@example.com. That makes it easier for the tool to capture inputs. If you mess up, stop, undo, or re-record the short segment. Less editing later saves time.
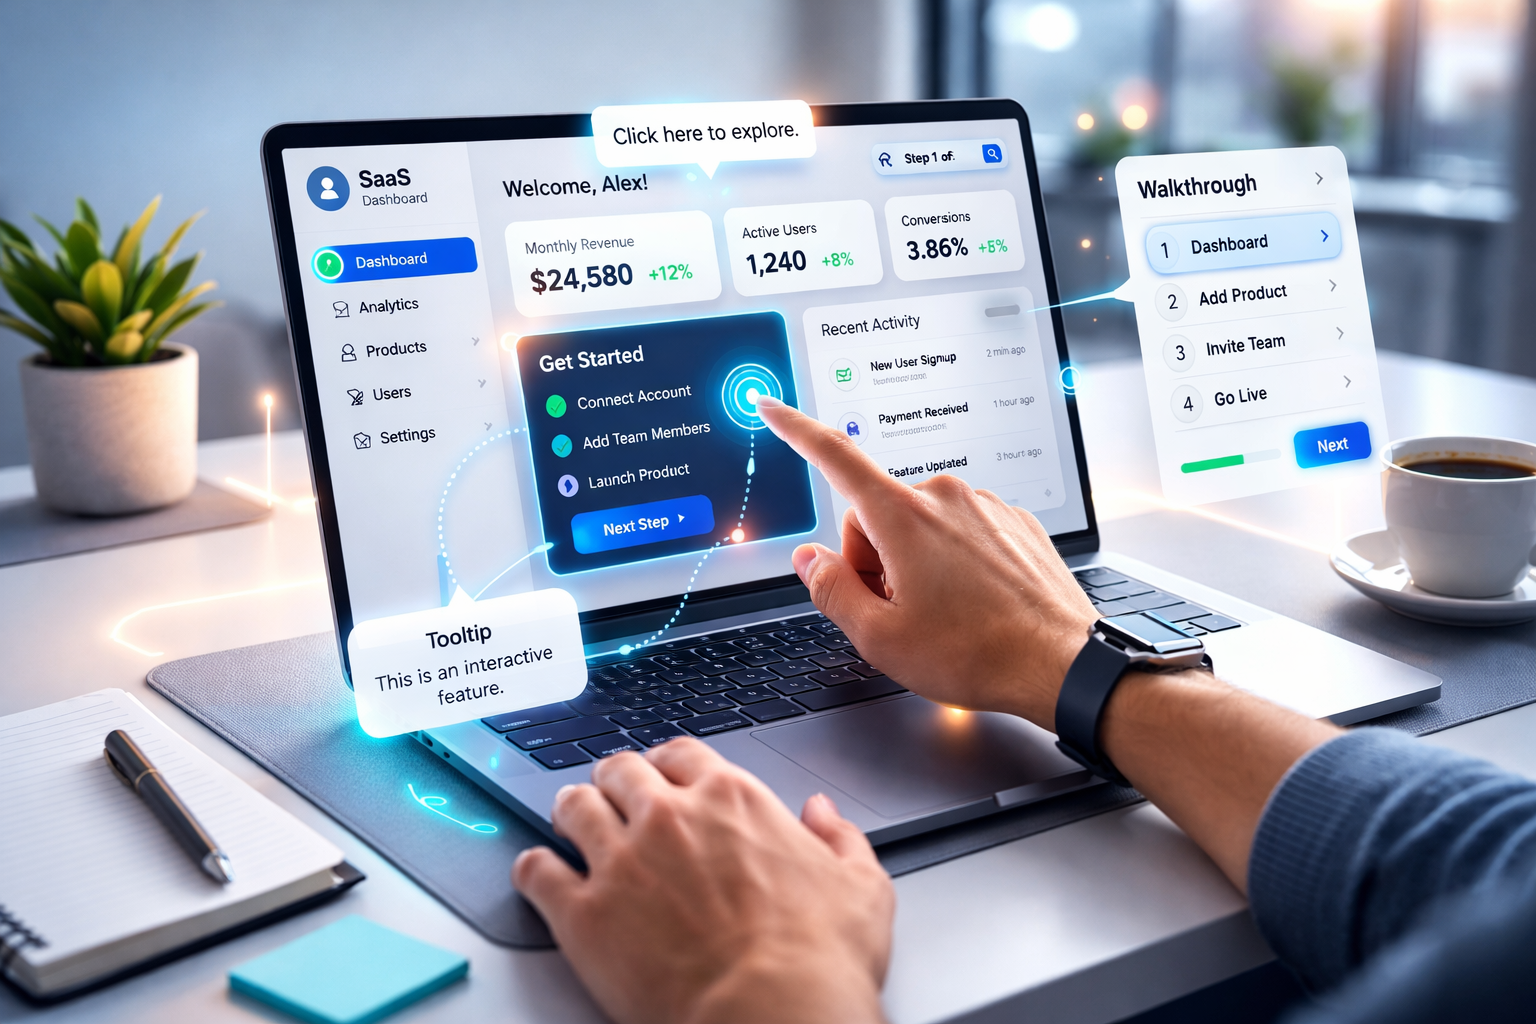
4. Add hotspots and tips
Hotspots are the clickable highlights that guide attention. Use them to show where to click next or to explain why something matters. Keep copy short and user-focused. Instead of writing "This is the create button", say "Create a new lead here".
Try adding short microcopy that anticipates questions. For example, if a setting is optional, add the note "Optional - skip for now" so users do not get stuck debating whether to toggle it.
5. Personalize the experience
Really, one of the main reasons why a generic product tour typically underperforms compared to a well-crafted walkthrough is that the latter is personalized. You can customize the materials based on, for example, job roles, industries, or the number of users. In fact, it is not necessary to have many versions. Just design a handful of targeted routes for your main market segments.
On the other hand, personalization can be very limited and only consist in changing the company name that appears in the demo data or using different examples that are more aligned with the target persona. It turns the demo into a piece that has been made for the individual viewer, and that is quite important.
6. Test with real people
It's a must to have a walkthrough done with somebody who hadn't been part of building it. Seeing how they use it will show you the points where they hesitate. Are you sure they didn't accidentally click something? Wasn't the tooltip giving them a hard time? Those are the spots you need to work on.
From my experience, the same early testers that turned up the most important fixes also got turned up by a formal usability study. Just get a colleague, a friendly client, or a salesperson and play through the demo with them. It will bring to light tiny issues which, to a large extent, affect conversion.
7. Publish and automate delivery
Once you have finished the walkthrough and feel content, just go ahead and publish it. Next, link it up to wherever your potential customers will value it. You can easily place it on your pricing page, include it in your onboarding emails, or allow users to request it right from your app. Most no-code demo tools give you not only embed codes, sharable links but also marketing automation platform integrations.
By making the demo available on-demand, sales and support teams will get a break. Customers get the chance to help themselves at an early stage and only reach out for a live conversation when they have more detailed and specific questions.
Examples: Simple walkthroughs you can build today
Below are quick demo templates you can make without code. Each is built around a single "aha" moment so your audience sees value quickly.
- Quick setup tour - Show account creation, basic preferences, and where to find help. Keep it under one minute.
- Key feature sprint - Walk through your signature feature end to end. Let users perform one meaningful action, like generating a report.
- Role-based demo - A path for admins showing configuration options and a separate path for power users showing advanced workflows.
- Integration demo - Show how to connect a third-party tool and the first successful sync. That eases integration fears.
Each template focuses on one outcome and uses simple, human language. You can build all of these with any modern no code demo builder.
How to measure success
Metrics matter. They tell you if your walkthroughs are helping move prospects forward. Here are a few practical KPIs I track when I build interactive demos.
- Completion rate - What percentage of users complete the walkthrough?
- Time to complete -Is the walkthrough too long, too short, or just right?
- CTA rate - What share of users who see the walkthrough opt for the next step - sign up, book a meeting etc.?
- Support ticket reduction - Do walkthroughs help in decreasing the number of repeated questions?
- Conversion lift - What is the difference in trial-to-paid conversion rates of the users who used the demo and those who didn't?
To ramp up your performance, direct your attention to completion rate and CTA rate. If these two are very low, consider shortening the flow and clarifying the next step. Changes that seem minor may lead to major gains.
Common mistakes and how to avoid them
I've seen teams trip over a few predictable things. You can avoid them if you watch for these pitfalls.
- Too much detail - Trying to teach every feature in one walkthrough overwhelms users. Keep tours focused.
- Assuming familiarity - New users do not know your labels or icons. Call out nouns and verbs clearly.
- Ignoring mobile - If your product is used on mobile, test on mobile. UI differences break many tours.
- Not testing with real users - Teams sometimes test only internally. Real users behave differently.
- Using technical jargon - Replace internal names with terms your buyer understands.
A quick tip: after building a tour, try to explain it out loud in plain language. If it sounds like product documentation, rewrite it to sound like a short conversation.
Putting it all together with demodazzle
If you want a practical example, demodazzle is a no code demo builder designed for teams that need interactive product demos fast. We built it to solve the exact problems teams tell me they have: slow demo creation, too many manual sessions, and the need for safe demo data.
Demodazzle lets you capture the whole flow of your demo, highlight key spots, add customized demo data and create walk-throughs that can be embedded in your website or app. This tool give demo automation support which means you can start a walkthrough when a visitor completes a conversion event or when a visitor receives an onboarding email.
I also admire demodazzle for how it deals with data. You can illustrate various demo scenarios by means of demo data only and not by showing the real data that is kept in production. This way you are reducing the risk and at the same time you are able to perform a full end-to-end workflow demonstration such as making invoices or syncing contacts.
If you are evaluating SaaS demo tools, look for these capabilities:
- Easy recording and visual editing
- Safe demo data injection
- Simple personalization for roles and industries
- Embeddable links and analytics
- Integrations with your marketing and sales stack
Demodazzle hits those boxes and helps teams move from idea to live walkthrough quickly. It's not the only tool on the market, but it is built by people who used to run product marketing and sales enablement programs. That practical background matters.
Quick checklist before you publish
Use this checklist before you share your walkthrough with customers. It helps catch small issues that hurt user experience.
- Is the walkthrough under two to three minutes for most flows?
- Is the copy short, actionable, and role-focused?
- Are interactive elements visible and easy to click on mobile and desktop?
- Does the demo use sanitized test data rather than production data?
- Are next steps clear at the end of the walkthrough?
- Did you test with someone external to the build?
If you answer yes to most of these, you are ready to publish. If not, iterate before sending the link to prospects.
Realistic example: 5 minute walkthrough for a project management app
Here is a simple human example you can model. This is short and practical. It shows value fast.
- Title slide: "Create a new project and invite a teammate - 3 minutes". Keep it quick.
- Step 1 - Create project: Click New Project, enter Name and Deadline, hit Create.
- Step 2 - Add tasks: Add three sample tasks and assign an owner. Show how to set priority.
- Step 3 - Invite teammate: Click Invite, enter demo@example.com, set role to Editor.
- Step 4 - Show outcome: Open the project dashboard and show the Gantt or board view with the new tasks.
- Call to action: "Want this setup in your account? Book a free demo today." with a link.
Notice how each step gives a small win. The user sees immediate results after each action. That builds momentum and reduces drop off.
Where to use interactive walkthroughs
Walkthroughs belong in lots of places across the funnel. Here are a few high-impact spots.
- Pricing and features pages - Let prospects test key features before they commit.
- Trial onboarding - Guide new users to the critical first action.
- Sales outreach - Embed personal walkthroughs for high value prospects.
- Knowledge base - Replace long articles with interactive mini-tours.
- In-app help - Trigger a walkthrough when users get stuck or hit a key page.
In my teams we saw the best lift from embedding walkthroughs on the pricing page and in trial welcome emails. People are in evaluation mode on those pages. A quick interactive demo answers questions that static pages cannot.
Integrations and ops considerations
When you introduce demo automation, think about the rest of your stack. You will likely want to link walkthrough completion to your CRM, product analytics, or marketing automation system. That helps you see which demos lead to meaningful outcomes.
Set up simple triggers. For example, add a tag to leads who complete a walkthrough so sales can follow up with personalized next steps. Or feed walkthrough completion events into your product analytics to compare onboarding success across cohorts.
Also think about access control. If your product has permission layers, provide a demo that simulates those roles so viewers see the right UI. No code tools typically let you emulate these views without complex engineering work.
Budget and resourcing
Creating interactive walkthroughs is rarely expensive. The main cost is time. Budget time for an initial pilot and then for periodic updates. Products change. Walkthroughs that show outdated UIs quickly lose credibility.
- Initial pilot: 1 to 2 weeks to build and test 2 to 3 walkthroughs.
- Ongoing maintenance: 1 to 2 days a month to update or add new demos.
- Team owners: Product marketing or customer success usually manage content. Keep engineering only for integrations that require deeper work.
Your first pilot should be small. Pick one high-value flow, build it, measure, and iterate. If the demo moves the needle you will justify more investment.
Find more: Online Training Programs for SaaS Teams: What Actually Works
Final thoughts and quick tips
Interactive product walkthroughs are one of the highest leverage things you can add to a SaaS GTM stack. They make complex features approachable and reduce the friction between discovery and adoption.
Keep these quick tips in your pocket:
- Focus on outcomes not features. Make the first step meaningful.
- Simplify copy - write like you would explain something to a colleague over coffee.
- Personalize for your top 2 or 3 buyer personas, not for everyone.
- Measure completion and CTA rate first. Those tell you if people find the demo useful.
- Update walkthroughs after product changes. Outdated tours erode trust fast.
If you are just getting started, pick the smallest test that could work. Build a 90 second walkthrough that shows your core value. Publish it on your pricing page and see what happens. You will learn a lot from how users interact with it.
Faqs:
1. What is the concept of interactive walkthroughs?
Interactive walkthroughs are essentially guided, clickable product experiences whereby you are given the opportunity to try out features one by one instead of simply watching a demo or reading documentation.
2. Do I need coding skills to create interactive walkthroughs?
Fortunately, you don't. With the help of latest no code tools you can design an interactive walkthroughs without writing a single line of code. You will be able to record your actions, incorporate tooltips, and create flows visually.
3. How do interactive walkthroughs improve conversions?
On one hand, they enable people to use the product themselves which, on the other hand, give them confidence and can decrease the level of hesitation. Typically, such a development triggers an increase in the conversion of trials into paid subscriptions and quicker decision making.
4. Where can I use interactive walkthroughs?
Interactive walkthroughs are a versatile tool that can be employed to enhance user guidance and engagement by using them in communication channels such as landing pages, pricing pages, onboarding flows, sales emails, and even within your application.
5. What makes a good interactive walkthrough?
An excellent walkthrough is concise, concentrates on a single main result, is very easily understood, is user-specific, and has an obvious next step or call-to-action.
Helpful Links & Next Steps
Want to see a demo builder in action? Book a free demo today and we will walk through examples tailored to your product and goals.